
In a world where sweet cravings often lead us down the fast-food lane, I stumbled upon a delightful secret: a healthier twist on the classic candy bar you love—Healthy Gluten-Free Vegan Kit Kat Bars. This recipe is not just a guilt-free indulgence; it’s a clever way to enjoy a crispy, crunchy treat that maintains the melt-in-your-mouth experience of the original. With its gluten-free, dairy-free, and vegan-friendly ingredients, this snack is perfect for those looking to satisfy their sweet tooth without compromising on health. Imagine whipping up a batch that’s both a crowd-pleaser and a nutritious snack option you can feel great about sharing. Ready to dive into homemade bliss? Let’s discover how this healthy version can bring joy to your kitchen!
Why love these Healthy Kit Kat Bars?
Irresistible flavor: Packed with rich chocolate and a heavenly filling, these bars mimic the classic Kit Kat while being guilt-free.
Nutritiousness meets indulgence: Enjoy all the crispy goodness without any gluten or dairy, making them suitable for a variety of diets.
Customizable to your needs: Easily swap out almond flour for tigernut flour, or use sunbutter instead of peanut butter for a nut-free option!
Quick to prepare: Whip up these scrumptious bars in no time—perfect for a busy day or to impress guests.
Perfect for sharing: Whether it’s a snack for yourself or a healthy treat to share, these bars are sure to please. Pair them with a comforting cup while enjoying a delightful moment, just like with my Avocado Deviled Eggs as an appetizer before diving into this sweet delight!
Healthy Kit Kat Ingredients
These ingredients will help you create a delightful treat in your own kitchen!
For the Cookie Base
• Almond Flour – Adds structure and a nutty flavor; substitute with tigernut flour for a nut-free version.
• Coconut Sugar – Acts as a natural sweetener; can be replaced with brown sugar if desired.
• Ground Flax Seeds – Provides binding and nutrition; swap with ground chia seeds or psyllium husk.
• Salt – Enhances flavor; Himalayan pink salt or sea salt works beautifully.
• Coconut Oil – Contributes to a rich texture and provides healthy fats; avocado oil is a great alternative.
For the Filling
• Water – Hydrates the dough; tap water will do just fine.
• Vanilla Extract – Adds aromatic depth; go for pure vanilla extract for the best results.
• Peanut Butter – Offers creaminess and flavor; use sunbutter to keep it nut-free.
For the Coating
• Dark Chocolate – Coats the bars, providing a rich, sweet bite; ensure it’s dairy-free for the best results.
With these ingredients in hand, you’re just one step away from crafting your own deliciously healthy Kit Kat bars!
Step‑by‑Step Instructions for Healthy Kit Kat
Step 1: Prepare Dry Ingredients
In a medium mixing bowl, combine 2 cups of almond flour, ½ cup of coconut sugar, ¼ cup of ground flax seeds, and a pinch of salt. Stir the ingredients together with a whisk to ensure even distribution, creating a well-blended base for your Healthy Kit Kat bars. Set this dry mixture aside as you move on to the next step.
Step 2: Mix Wet Ingredients
In a small bowl, mix ¼ cup of melted coconut oil, ¼ cup of water, and 1 teaspoon of pure vanilla extract until well combined. Gradually pour this wet mixture into the dry ingredients, initially using a spatula to blend them together. Once combined, use your hands to knead the dough gently for about 2 minutes until it holds together in a cohesive, slightly sticky ball.
Step 3: Roll Out Dough
Place the dough between two sheets of parchment paper. Using a rolling pin, roll the dough out to an even thickness of about ⅛ inch. This thickness is critical to ensure the cookies bake evenly, yielding that perfect crispy and crunchy texture we love in Healthy Kit Kat bars. Once rolled, remove the top sheet of parchment.
Step 4: Cut Cookies
With a sharp knife or a pizza cutter, slice the rolled dough into rectangles measuring 3.5 inches by 0.75 inches. If necessary, re-roll any excess dough between the parchment sheets, ensuring minimal waste while maximizing cookie yield. Preheat your oven to 350°F as you prepare to bake the cookies.
Step 5: Bake
Arrange the cut cookies on a baking sheet lined with parchment paper, leaving space between each one. Bake in the preheated oven for 8–10 minutes, or until the edges are lightly golden. Keep an eye on them—the cookies will harden as they cool, so remove them when they’re just set. Let them cool on the baking sheet for 5–10 minutes before transferring them to a wire rack.
Step 6: Assembly
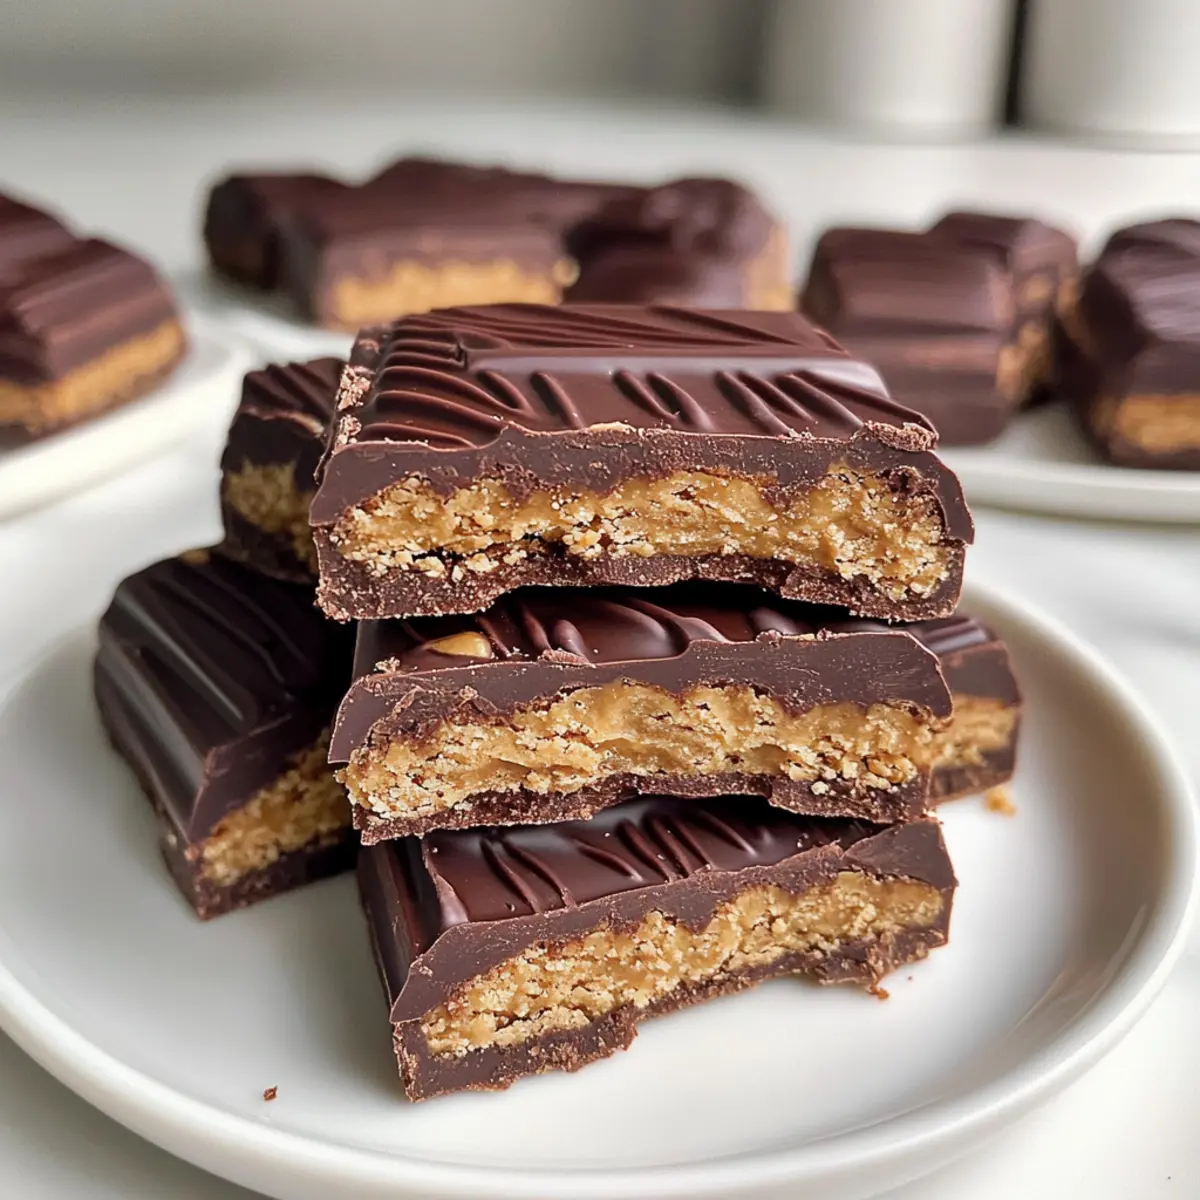
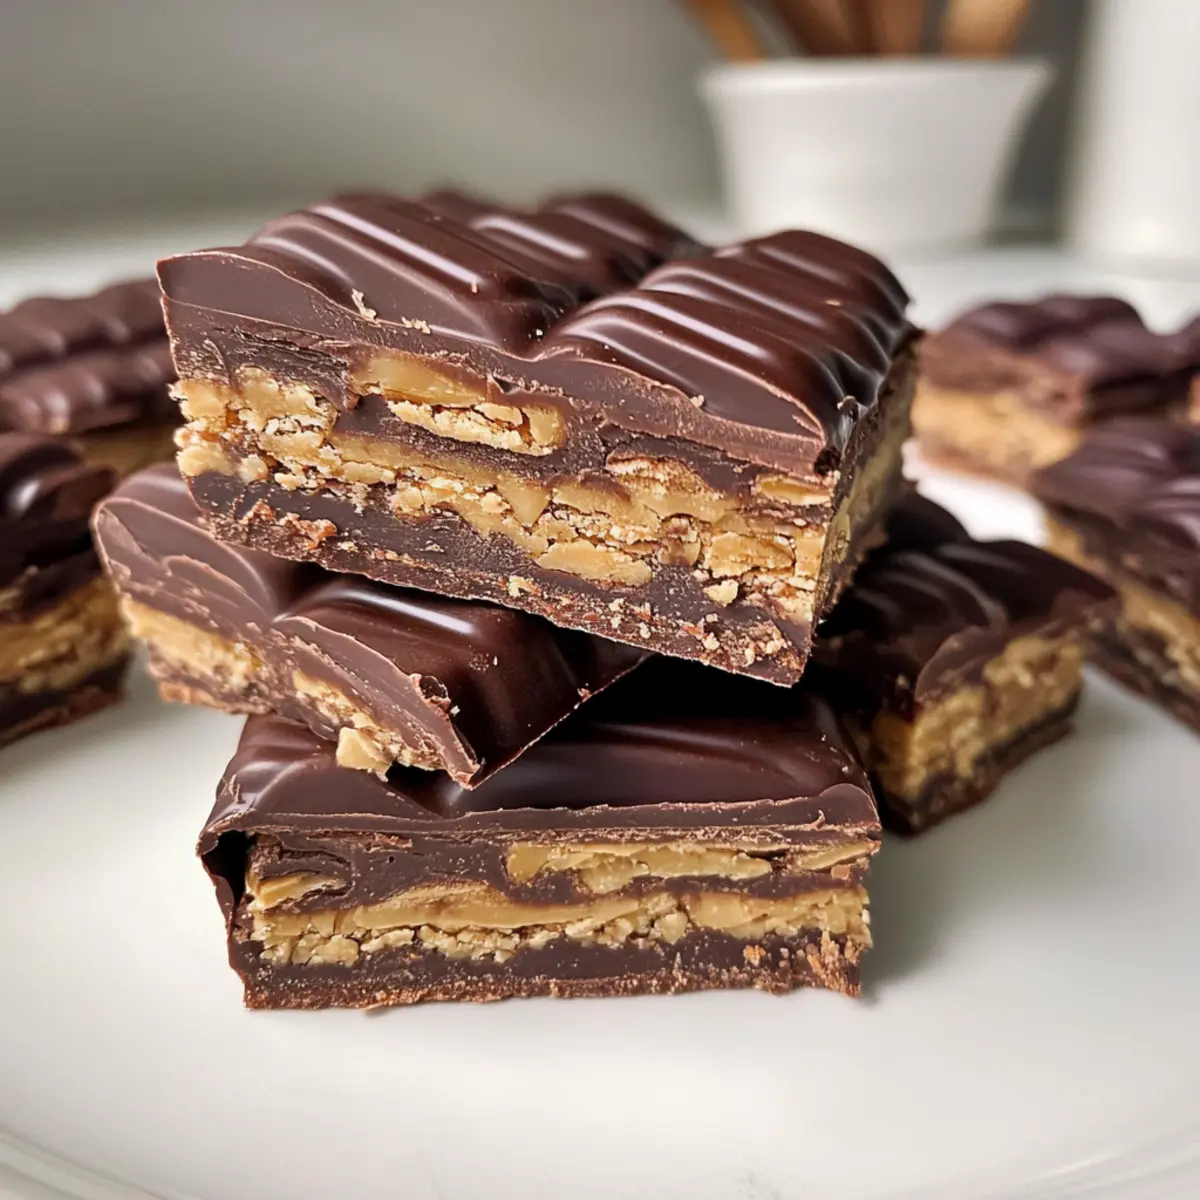
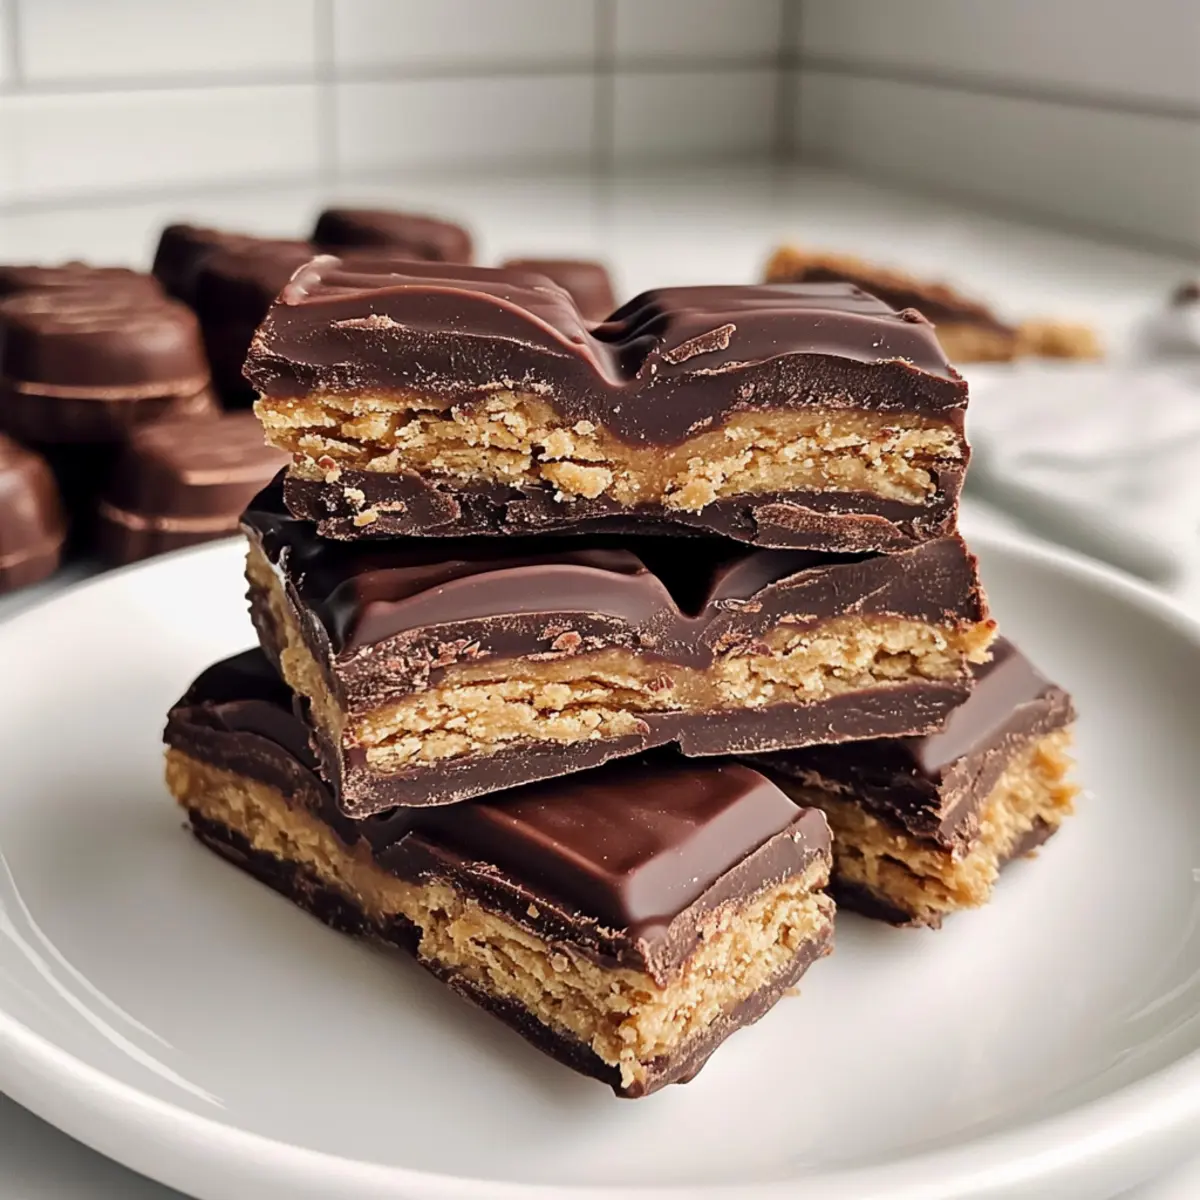
Once the cookies are completely cool, prepare your filling by mixing together ½ cup of creamy peanut butter with a touch of melted dark chocolate for added flavor. Layer equal amounts of this mixture between two cookies to form sandwiches, reminiscent of the classic Healthy Kit Kat bars we all adore.
Step 7: Chill
After assembling the cookies, melt 1 cup of dark chocolate gently in a microwave or double boiler until smooth. Dip each cookie sandwich into the melted chocolate to coat evenly, shaking off any excess. Place the coated bars on a parchment-lined tray and refrigerate for at least 30 minutes, or until the chocolate is set and firm for perfect enjoyment.
How to Store and Freeze Healthy Kit Kat
Fridge: Keep your Healthy Kit Kat bars in an airtight container in the fridge to maintain their freshness. They’ll last up to 2 weeks, perfect for grabbing a quick treat!
Freezer: For longer storage, freeze the bars in an airtight container or freezer bag. They can stay frozen for up to 2 months—just thaw in the fridge for a few hours before serving.
Reheating: If you prefer a warm treat, you can microwave a frozen bar for about 10-15 seconds. This will give you a slightly melty chocolate coating for an indulgent experience!
Wrapping: If you’re packing them for on-the-go snacks, individually wrap each bar in parchment paper before placing them in a container to keep them from sticking together.
Healthy Kit Kat Variations
Feel free to explore these delightful variations that may inspire your kitchen creativity!
-
Nut-Free Alternative: Swap almond flour for tigernut flour to keep allergies at bay, while still enjoying all the deliciousness.
-
Peanut-Free Twist: Use sunbutter instead of peanut butter for a completely nut-free option, perfect for school lunches or gatherings.
-
Natural Sweetness: Experiment with honey or maple syrup, but remember that honey will not keep the vegan status. Find the sweet level that suits your taste.
-
Cocoa Boost: Add unsweetened cocoa powder to the cookie mix for a richer chocolate flavor; just adjust the sweetness if needed. A touch of chocolate can elevate the experience!
-
Spice it Up: Incorporate a pinch of cinnamon or a dash of nutmeg into the dough for a warm, comforting twist that amplifies the flavors beautifully.
-
Caramel Layers: Add a drizzle of homemade caramel sauce between cookie layers for a chewy surprise that complements the crispy texture oh-so-well.
-
Different Chocolate Coating: Try rolling your bars in white dairy-free chocolate for a playful contrast, transforming the traditional into something exciting and new. It’s a fun aesthetic twist!
-
Coconut Crunch: Sprinkle toasted coconut flakes onto the chocolate coating before it sets for an extra layer of texture that’s reminiscent of those beach vibes.
With these variations, you can tailor your Healthy Kit Kat bars to suit any event or craving! For a fabulous snack combination, try pairing them with a cup of soothing herbal tea or perhaps a side of my delightful Carrot Cake Overnight for a blissful treat time!
Expert Tips for Healthy Kit Kat Bars
-
Ingredient Quality: Use high-quality dark chocolate for coating to ensure a rich, satisfying flavor. Check labels for dairy-free options to maintain the healthy profile.
-
Knead Gently: When mixing the dough, avoid over-kneading. This helps to keep the cookies from becoming tough, ensuring a delightful crunch in your Healthy Kit Kat bars.
-
Watch Bake Time: Keep an eye on your cookies while baking. They should be lightly golden; removing them too late can lead to a harder texture that lacks the desired crispiness.
-
Cooling Matters: Allow cookies to fully cool before assembling. This prevents the filling from melting and ensures a perfect bite without a messy treat.
-
Storage Tips: Store your Healthy Kit Kat bars in an airtight container to maintain freshness. They last for up to two weeks in the fridge or two months in the freezer without losing their delicious quality.
What to Serve with Healthy Gluten-Free Vegan Kit Kat Bars?
Imagine a cozy afternoon, savoring a delicately crafted treat paired with delightful accompaniments that elevate your experience to the next level.
- Almond Milk: Creamy and nutty, this dairy-free milk complements the chocolate while providing a soothing backdrop to the sweet treat.
- Herbal Tea: A fragrant cup of chamomile or peppermint tea pairs beautifully, creating a warm and comforting contrast to the crunchy bars.
- Fresh Berries: The natural sweetness and acidity of strawberries or raspberries add a refreshing burst, balancing the rich flavors of the Kit Kat bars.
- Nut Butter Dip: A small dish of sunbutter or almond butter serves as a delightful dip, enhancing both flavor and nutrition while adding creaminess.
- Dark Chocolate Drizzle: For indulgence, drizzle melted chocolate over the Kit Kat bars for a captivating presentation and extra chocoholic bliss!
- Coconut Whipped Cream: A dollop of fluffy coconut whipped cream adds a light and airy texture that accentuates the chocolatey goodness.
- Fruit Smoothie: Serve with a fruity smoothie infused with banana and spinach for a nutritious boost that transforms your snack into a fulfilling meal.
- Paleo Snack Mix: A crunchy mix of seeds and dried fruits offers a delightful contrast in texture, making it a perfect companion for this healthy sweet treat.
- Iced Coffee: A refreshing glass of iced coffee enhances the experience, merging that caffeinated jolt with the scrumptious chocolate flavors.
Make Ahead Options
These Healthy Kit Kat bars are perfect for meal prep enthusiasts! You can prepare the cookie base and filling up to 24 hours in advance. Simply mix the dry and wet ingredients, roll out the dough, and bake the cookies; let them cool completely, then store them in an airtight container in the fridge. Just before serving, layer the cooled cookies with the filling and coat them in melted dark chocolate, allowing them to set in the fridge for 30 minutes. For even more convenience, you can also freeze the assembled bars for up to two months—just thaw them in the refrigerator for a few hours before enjoying. This way, you ensure delicious results with minimal effort on busy days!
Healthy Kit Kat Recipe FAQs
How do I select the right almond flour?
Absolutely! When choosing almond flour, look for a fine, blanched version that gives your cookies a tender texture. Avoid almond meal, which is coarser and can yield a grainier result. If you’re looking for a nut-free option, I recommend tigernut flour, which has a subtly sweet flavor and crunchy texture similar to almond flour.
How should I store the Healthy Kit Kat bars?
To keep your Healthy Kit Kat bars fresh, store them in an airtight container in the fridge, where they will last up to 2 weeks. If you’d like to save some for later, freezing is a fantastic option! Wrap each bar individually in parchment paper, then place them in an airtight container or freezer bag. They can be frozen for up to 2 months, and you can simply thaw them in the fridge for a few hours before serving.
Can I freeze these healthy bars?
Yes, absolutely! Freezing is a great way to extend the life of your Healthy Kit Kat bars. After assembling and coating them in chocolate, allow the bars to set completely. Then, wrap each one in parchment paper and place them in an airtight container. This prevents them from sticking together. To enjoy, just take out what you need and let them thaw in the fridge for a couple of hours!
What if my dough is too sticky or dry?
Very! If you find the dough too sticky, simply add a tablespoon of almond flour at a time until it reaches a workable consistency. Conversely, if the dough is too dry, mix in a teaspoon of water until it comes together. Remember, the dough should be slightly sticky but manageable; this texture is essential for achieving that crispy-crunchy bite you desire!
Are these bars suitable for dogs?
Not entirely! While the ingredients are healthy for humans, some elements like chocolate and peanut butter might not be safe for dogs. Always keep the bars out of reach of your pets! If you’re looking to make a treat for your furry friend, consider creating a dog-friendly snack with oat flour and dog-safe ingredients instead.
Can I substitute ingredients for allergies?
Absolutely! If you have nut allergies, replacing almond flour with tigernut flour is a great alternative, giving you a nut-free option without losing that delightful texture. For peanut butter, sunbutter works wonderfully too! Just ensure that any alternative ingredients you choose fit your dietary needs, especially pre-packaged items like chocolate, which can sometimes contain traces of allergens.

Deliciously Healthy Kit Kat Bars You Can Make at Home
Ingredients
Equipment
Method
- In a medium mixing bowl, combine 2 cups of almond flour, ½ cup of coconut sugar, ¼ cup of ground flax seeds, and a pinch of salt. Stir together and set aside.
- In a small bowl, mix ¼ cup of melted coconut oil, ¼ cup of water, and 1 teaspoon of pure vanilla extract until well combined. Gradually add to the dry ingredients and blend.
- Place the dough between two sheets of parchment paper and roll out to about ⅛ inch thick.
- Cut the rolled dough into rectangles measuring 3.5 inches by 0.75 inches. Preheat oven to 350°F.
- Arrange cut cookies on a parchment-lined baking sheet and bake for 8-10 minutes until edges are lightly golden. Let cool on a wire rack.
- Mix ½ cup of creamy peanut butter with melted dark chocolate for filling. Spread the mixture between two cookies.
- Melt 1 cup of dark chocolate and dip each cookie sandwich to coat. Refrigerate for at least 30 minutes until set.
Leave a Reply