
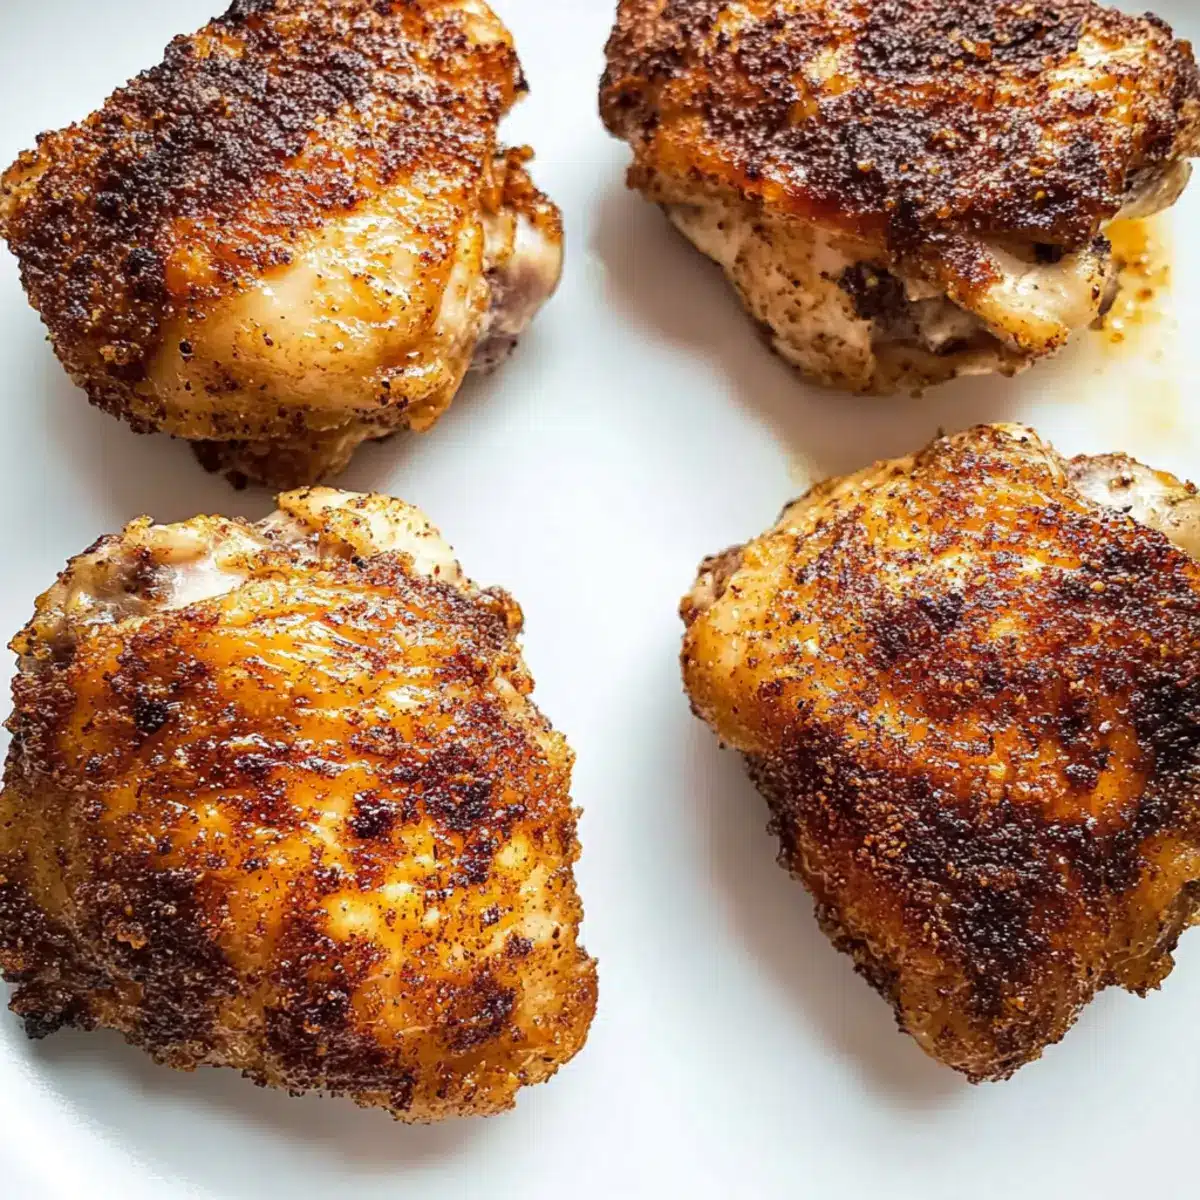
As I pulled the crispy Air Fryer Chicken Thighs from the basket, the sizzling sound was nothing short of a culinary triumph. Each piece, with its golden-brown skin, promised a delightful crunch that masked the juicy tenderness waiting inside. This recipe not only guarantees a quick cooking time—perfect for busy weeknights—but also introduces a little baking powder secret that elevates your dinner to restaurant-quality appeal. Whether you’re a novice cook or a seasoned pro, these chicken thighs will not just be a staple in your home but a crowd-pleaser that you can adapt to suit any palate. Curious to know how to unlock that irresistible crispiness? Let’s dive in!
How do you achieve perfect crispiness?
Simplicity and Speed: This recipe for Air Fryer Chicken Thighs is incredibly easy to follow, making it perfect for those who want a delicious meal without spending hours in the kitchen.
Irresistible Flavor: The unique blend of spices, with the secret baking powder, delivers mind-blowingly crispy skin that rivals fried chicken.
Adaptable to Your Taste: Feel free to experiment—whether you prefer boneless thighs or a smoky twist with paprika, you can make this recipe your own.
Crowd-Pleasing Delight: Serve these juicy thighs at your next dinner party or family gathering; everyone will be raving about your culinary skills!
For even more quick dinner ideas, check out Air Fryer Egg recipes that are perfect for busy nights.
Air Fryer Chicken Thighs Ingredients
For the Chicken
• Bone-in, Skin-on Chicken Thighs – These provide rich flavor and moisture, giving you the juiciest bites.
• Olive Oil – Adds fat for cooking and helps achieve that crispy texture; avocado oil can be used as a substitute for a higher smoke point.
For the Spice Mix
• Paprika – Offers a mild heat and vibrant color; feel free to switch to smoked paprika for a deeper, smokier flavor.
• Garlic Powder – Adds savory depth; you can substitute with fresh garlic, but cooking times may need to be adjusted.
• Pepper – Enhances the seasoning; using freshly cracked black pepper provides the best flavor.
• Cumin – Adds warmth and earthiness; taco seasoning can be a great alternative at the same ratio.
• Salt – Essential for flavor enhancement; adjust to taste for a low-sodium option.
• Baking Powder – This key ingredient helps achieve that sought-after crispy skin; ensure you use baking powder, not baking soda.
This ingredient list is just the beginning of what makes Air Fryer Chicken Thighs a must-try dish!
Step‑by‑Step Instructions for Air Fryer Chicken Thighs
Step 1: Preheat the Air Fryer
Begin by preheating your air fryer to 400°F (200°C) for about 5-6 minutes. This crucial step ensures that your chicken thighs start cooking evenly and achieve that golden, crispy exterior right from the get-go. You’ll know it’s ready when the air fryer begins to circulate heat, filling your kitchen with anticipation.
Step 2: Prepare the Chicken Thighs
While the air fryer heats up, take your bone-in, skin-on chicken thighs and pat them dry using paper towels. This helps to remove excess moisture, ensuring that they become deliciously crispy. Next, place the thighs in a mixing bowl and drizzle them with olive oil, coating them evenly to promote a beautiful, golden finish.
Step 3: Mix the Spice Blend
In a separate small bowl, combine paprika, garlic powder, pepper, cumin, salt, and baking powder to create your seasoning mix. The baking powder is key to achieving that coveted crispy texture of air fryer chicken thighs. Stir the ingredients well until they form a cohesive blend, ready to infuse your chicken with flavor.
Step 4: Season the Chicken
Take the spice mixture and generously season both sides of the chicken thighs. Use your hands to rub the spice blend into the skin, ensuring every nook and cranny is coated. This will enhance the flavor and contribute to that irresistible crispy skin as the chicken cooks in the air fryer.
Step 5: Arrange in the Air Fryer
Carefully place the perfectly seasoned chicken thighs skin-side up into the air fryer basket, making sure not to overcrowd the basket. This allows hot air to circulate around each piece, ensuring even cooking. Set the timer to cook for 10 minutes, and let the air fryer work its magic.
Step 6: Flip and Finish Cooking
After the initial 10 minutes, gently flip the chicken thighs to crisp up the other side. Continue cooking for an additional 6-10 minutes, checking for doneness. The skin should be golden brown and crispy, and an instant-read thermometer will confirm that the internal temperature has reached at least 165°F (75°C), ideally 185°F (85°C) for max flavor.
Step 7: Rest Before Serving
Once your air fryer chicken thighs are perfectly cooked, remove them from the basket and let them rest for 5-10 minutes. This resting period allows the juices to redistribute throughout the meat, ensuring each bite is juicy and tender. Now, they’re ready to serve and impress!
Storage Tips for Air Fryer Chicken Thighs
Fridge: Store leftover Air Fryer Chicken Thighs in an airtight container for up to 3 days to maintain freshness and flavor.
Freezer: For longer storage, freeze the chicken thighs in an airtight freezer bag or container for up to 2 months. Make sure to label with the date!
Reheating: To revive that crispy goodness, reheat your chicken thighs in the air fryer for about 5-7 minutes at 375°F (190°C) until warmed through and crispy again.
Thawing: When ready to enjoy frozen chicken, thaw in the refrigerator overnight before reheating for best results.
Make Ahead Options
These Air Fryer Chicken Thighs are perfect for busy home cooks looking to simplify meal prep! You can season the chicken thighs up to 24 hours in advance to allow for deeper flavor absorption, simply rub the spice mixture over the thighs and store them in an airtight container in the refrigerator. Additionally, if you’re short on time, you can pat the chicken dry and coat with olive oil ahead of time—just make sure to refrigerate until you’re ready to cook. When it’s time to finish the dish, simply preheat your air fryer, then cook the seasoned chicken as per the instructions for crispy, restaurant-quality results with minimal effort!
Air Fryer Chicken Thighs: Variations & Substitutions
Feel inspired to put your own twist on these crispy delights and make the recipe uniquely yours!
- Boneless Thighs: Use boneless skinless thighs, but reduce cooking time by a few minutes to keep them juicy.
- Smoky Flavor: Replace paprika with smoked paprika for a deeper, richer flavor that adds warmth to each bite.
- Spicy Kick: Add cayenne pepper or chili powder to the spice mix for an extra heat that will tantalize your taste buds.
- Herby Twist: Incorporate fresh herbs like rosemary or thyme into the spice blend for a fragrant and fresh flavor profile.
- Mediterranean Flair: Swap out the spices for a mix of oregano, lemon zest, and garlic for a zesty Mediterranean chicken dish.
- Baking Powder Alternative: If you’d prefer not to use baking powder, you can achieve crispiness with cornstarch as a substitute.
- Citrus Marinade: Marinate the chicken thighs in lemon juice and olive oil for an hour before seasoning for a bright, zesty flavor boost.
For additional flavorful ideas, you might enjoy these easy and tasty Air Fryer Egg recipes that can round out any meal perfectly!
What to Serve with Crispy Air Fryer Chicken Thighs?
As you unveil your golden-brown chicken thighs, imagine transforming this dish into a satisfying feast for your family or friends.
-
Creamy Mashed Potatoes: The buttery smoothness of mashed potatoes complements the crispy texture of the chicken, making every bite indulgent.
-
Roasted Vegetables: A colorful medley of roasted veggies adds a lovely crunch and natural sweetness, balancing out the savory chicken beautifully.
-
Fresh Garden Salad: Crisp greens with a tangy vinaigrette offer a refreshing contrast and brighten up the meal, ensuring you leave the table feeling light and happy.
-
Garlic Bread: The warm, toasted garlic-infused bread makes a perfect dipping companion, soaking up chicken juices and rich flavors.
-
Coleslaw: Crunchy and slightly tangy, coleslaw provides a delightful contrast to the crispy chicken, adding fun and flair to every bite.
-
Herbed Rice: Fluffy, herb-infused rice absorbs the flavors of the chicken, creating a deliciously cohesive meal experience—comfort food at its finest.
-
Chilled White Wine: A glass of chilled Sauvignon Blanc pairs fantastically, cutting through the richness of the chicken and enhancing the meal with a touch of sophistication.
-
Chocolate Mousse: End your feast with a light and airy chocolate mousse, offering just the right amount of sweetness to round off your dining experience.
Expert Tips for Air Fryer Chicken Thighs
• Pat Them Dry: Ensuring chicken thighs are fully dried before oiling is key for achieving that coveted crispy texture.
• Monitor Temperature: Keep an eye on the internal temperature—overcooking will lead to dryness. Aim for at least 165°F for juicy results.
• Season Ahead: If you’re preparing them in advance, let the seasoned chicken thighs rest in the fridge for an hour. This enhances flavor absorption.
• Let Them Rest: Always rest the chicken for 5-10 minutes after cooking. This locks in moisture, making every bite delectably juicy.
• Cooking Variation: Using boneless thighs? Reduce the cooking time slightly, as they will cook faster than bone-in options.

Air Fryer Chicken Thighs Recipe FAQs
How do I choose the best chicken thighs?
Absolutely! When selecting chicken thighs, look for bone-in, skin-on pieces. The skin will yield that deliciously crispy texture, while the bone helps retain moisture during cooking. Check for a bright color with no dark spots, which indicates freshness. If possible, opt for organic or free-range options for the best flavor.
What’s the best way to store leftover chicken thighs?
Very good question! After enjoying your delicious Air Fryer Chicken Thighs, store any leftovers in an airtight container in the refrigerator. They should remain fresh for up to 3 days. Just make sure they cool completely before sealing to prevent condensation. For the best reheating results, I recommend using the air fryer again to restore that crispiness.
Can I freeze Air Fryer Chicken Thighs?
Absolutely! To freeze, first let the chicken thighs cool completely, then place them in an airtight freezer bag or container, labeling it with the date. They can be stored in the freezer for up to 2 months. When you’re ready to enjoy them, thaw in the refrigerator overnight before reheating to ensure even warming.
What if my chicken thighs aren’t crispy enough?
No worries! If your chicken thighs come out less crispy than expected, check a few things: Ensure they were patted dry before oiling, as moisture can hinder crispiness. Also, make sure your air fryer isn’t overcrowded, which can reduce airflow. Lastly, if they need a little extra crisp, pop them back in the fryer for a few additional minutes.
Are these chicken thighs safe for pets?
Great question! While boneless, cooked chicken meat can be a tasty treat for dogs, it’s essential to avoid adding any seasoning, especially garlic or onion, as these can be toxic to pets. Always consult your veterinarian if you’re uncertain about what human foods are safe for your furry friends.
Is there a dietary alternative for these chicken thighs?
Certainly! If you’re looking for a lower-sodium version, simply reduce or skip the salt in the spice mix. For a gluten-free option, all the ingredients listed are naturally gluten-free; just double-check any pre-packaged spices. If you prefer a spice mix with no cumin, try using dried herbs or a dash of lemon zest for added flavor!
Crispy Air Fryer Chicken Thighs: Juicy and So Easy to Make
Ingredients
Equipment
Method
- Preheat the air fryer to 400°F (200°C) for about 5-6 minutes.
- Pat the chicken thighs dry using paper towels and coat with olive oil.
- Combine the spices in a bowl and mix well.
- Generously season the chicken thighs with the spice mix.
- Arrange chicken thighs skin-side up in the air fryer basket and cook for 10 minutes.
- Flip the chicken thighs and cook for an additional 6-10 minutes, checking for doneness.
- Allow the chicken to rest for 5-10 minutes before serving.
Leave a Reply