
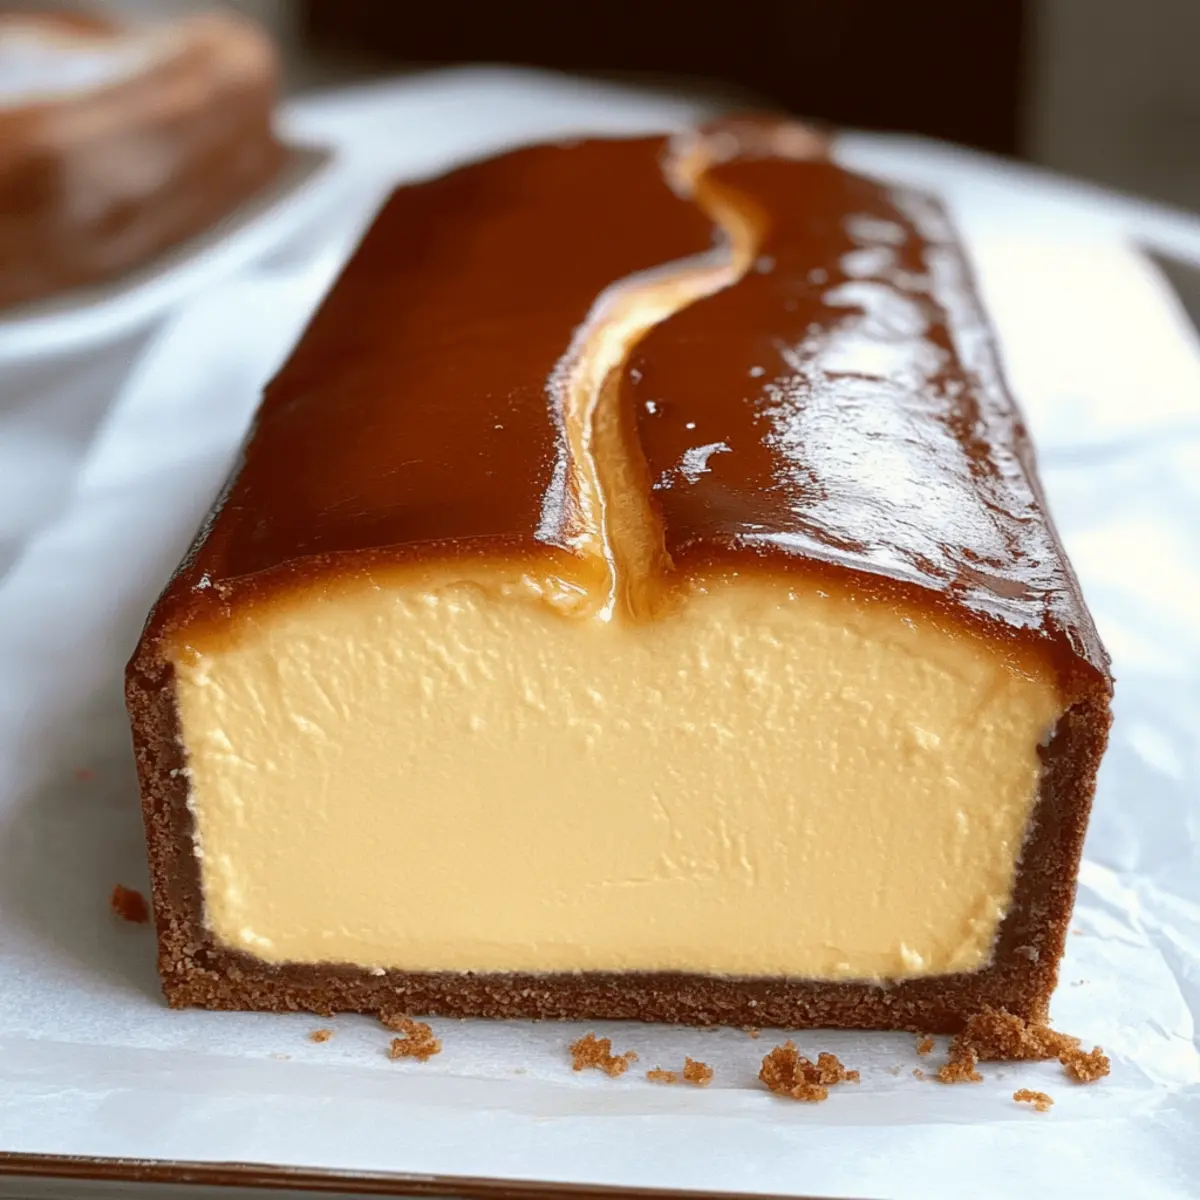
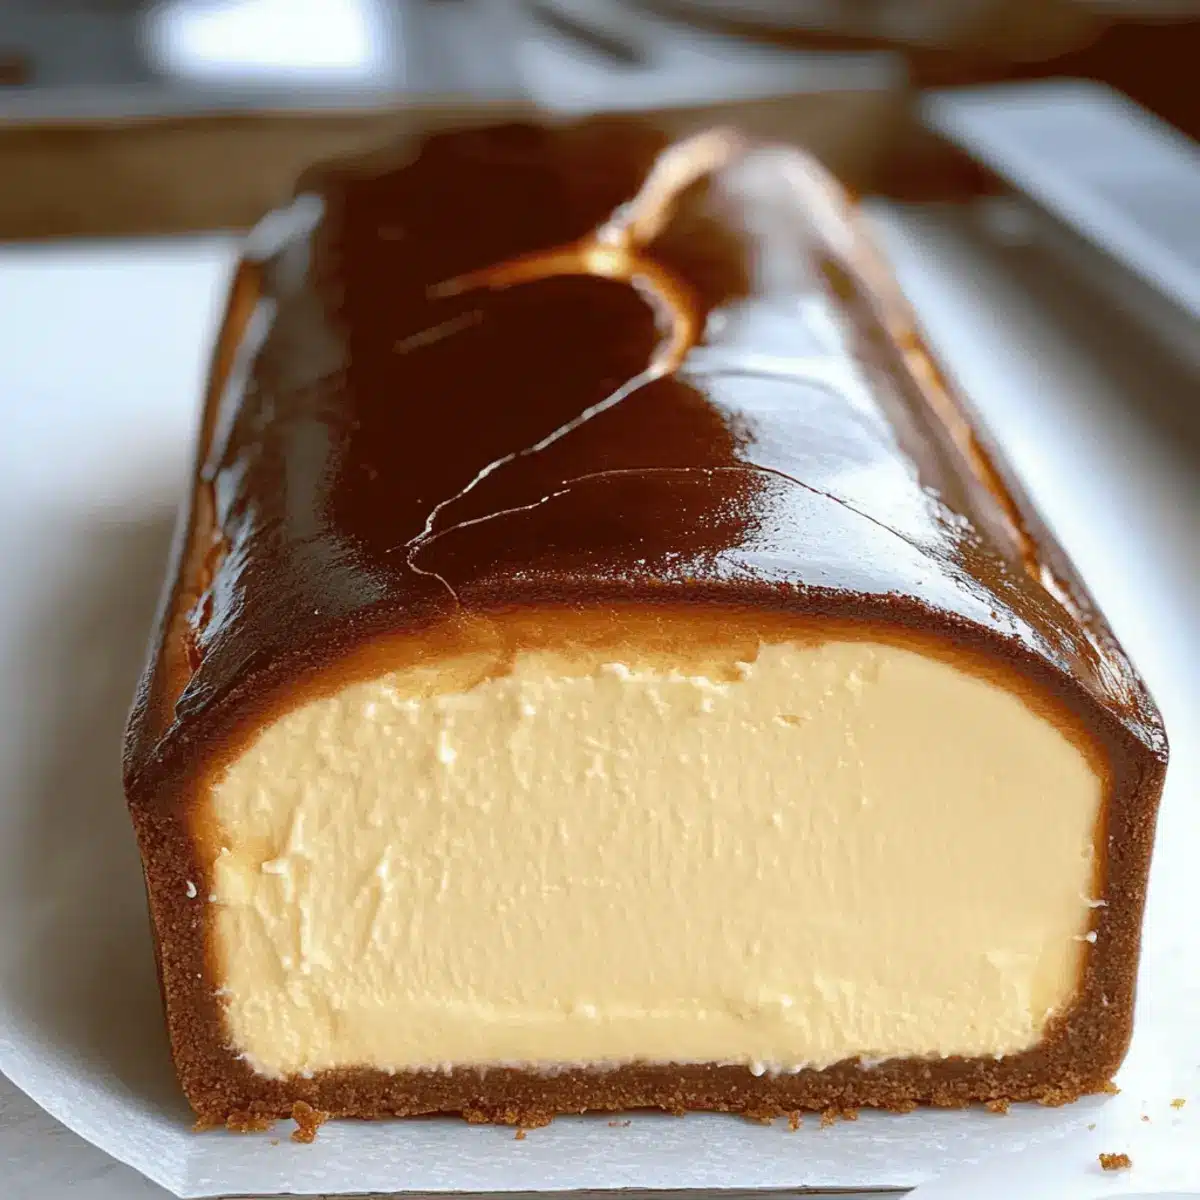
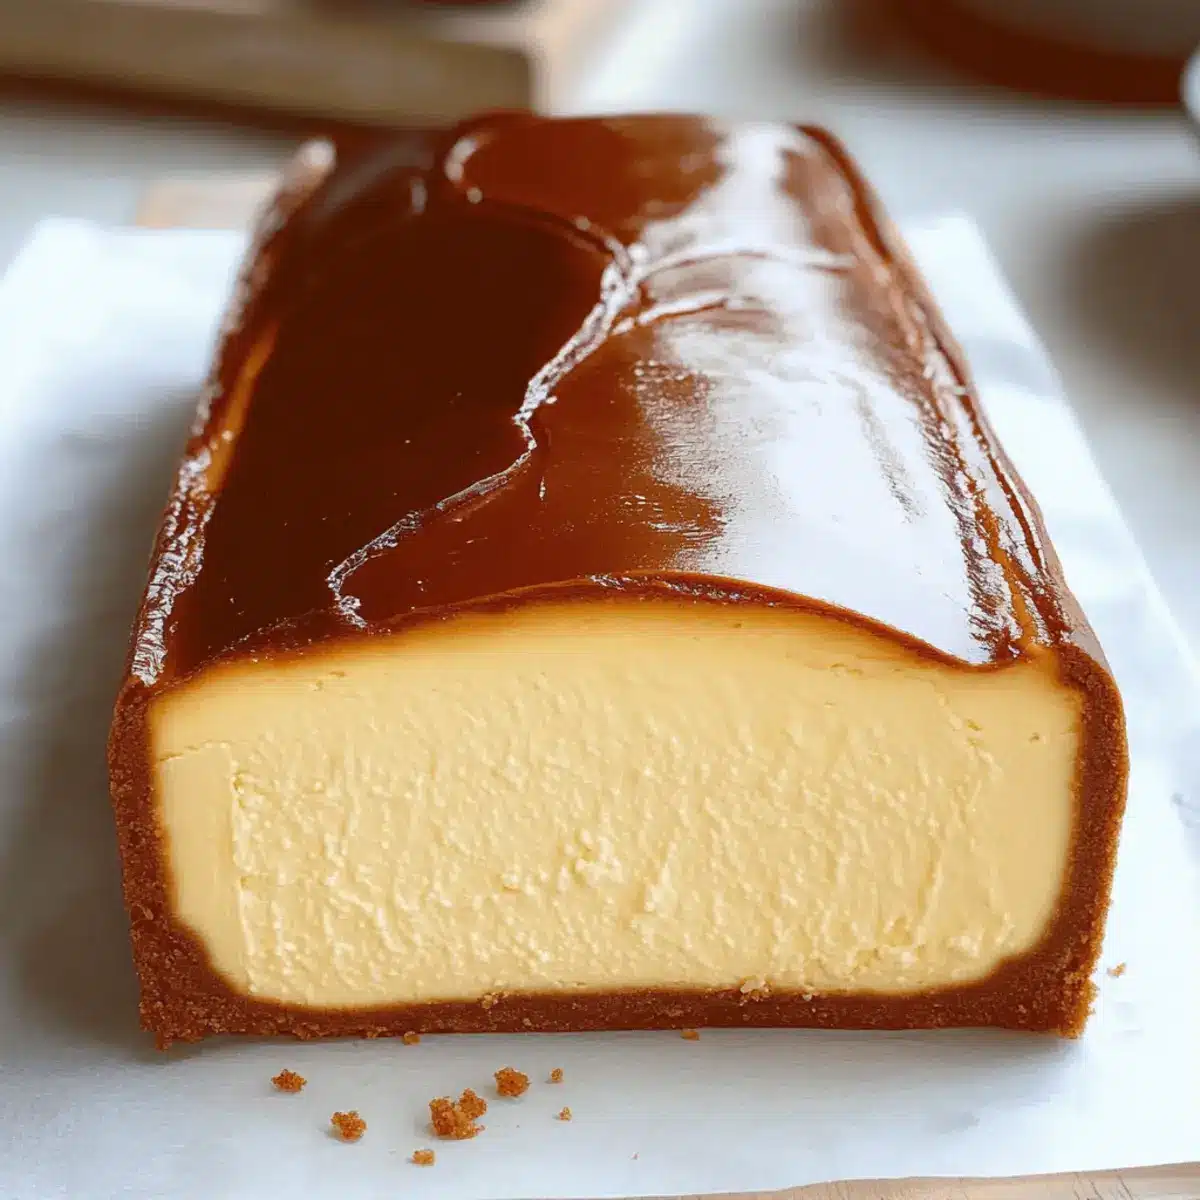
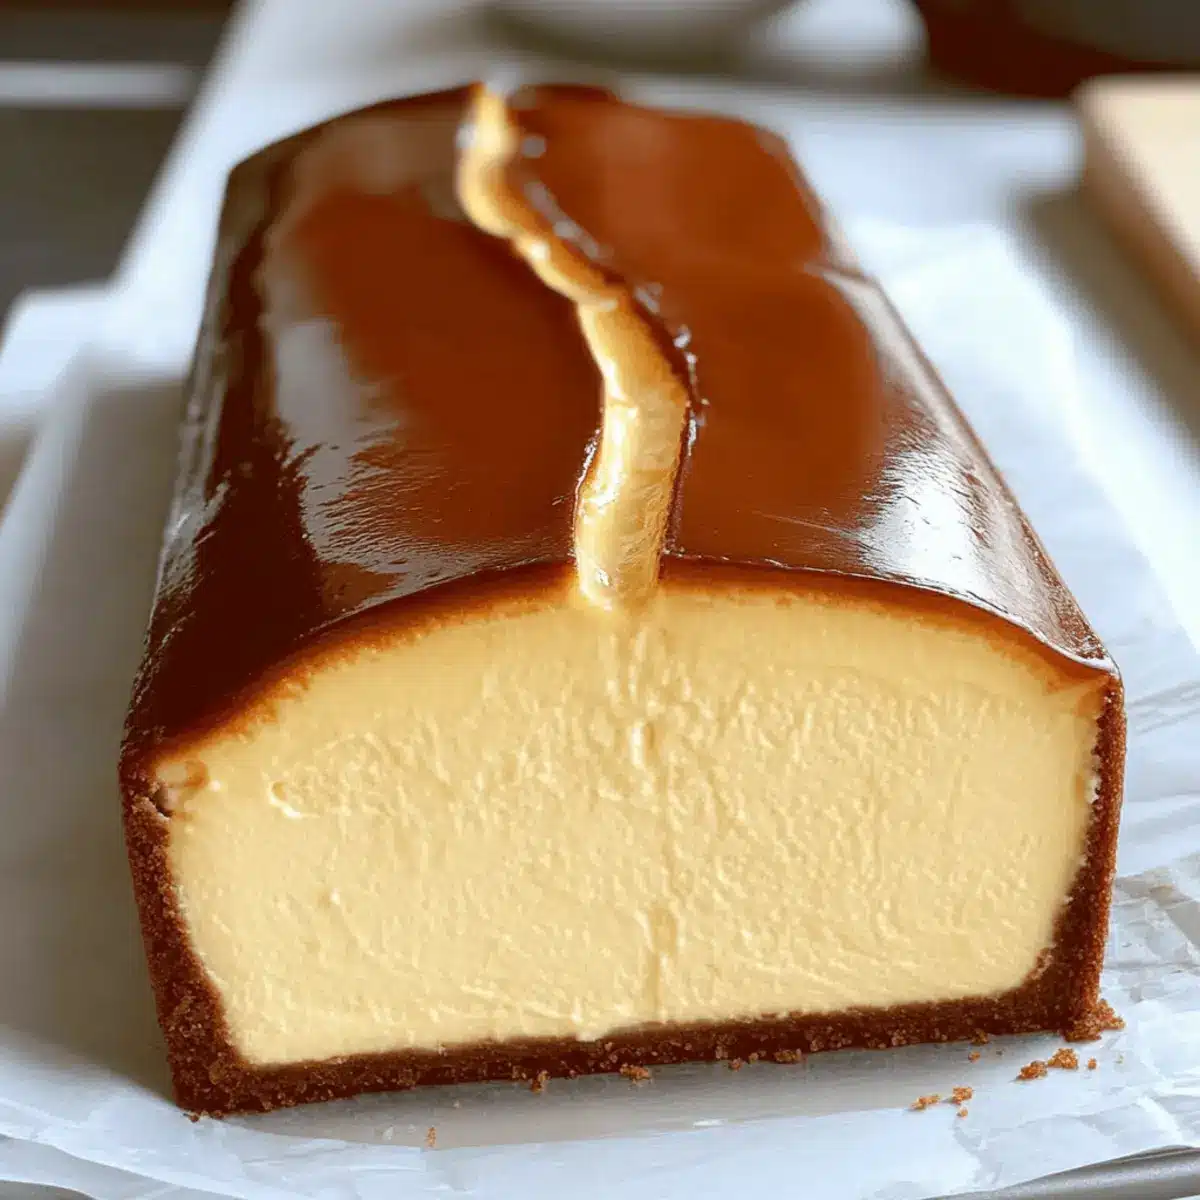
As I stood in my kitchen, the sweet aroma of cream cheese mingled with the promise of caramelized goodness wafted through the air, sparking an insatiable craving for Burnt Basque Cheesecake. This crustless delight is not only a showstopper, but it’s also incredibly easy to whip up in a loaf pan—perfect for those evenings when you want to indulge without the fuss. The combination of creamy custard and a beautifully charred top makes every bite a dream. Plus, being a small-batch recipe, it’s a fantastic option for cozy get-togethers or a little treat just for you. Ready to dive into the rich and decadent world of this cheesecake? Let’s make some magic in the kitchen!
Why is this cheesecake so special?
Simplicity at Its Best: This Burnt Basque Cheesecake requires minimal ingredients and effortless preparation, making it perfect for cooks of any skill level!
Indulgent Flavor: The luxurious creamy texture combined with the burnt caramelized top provides a delightful contrast that will have your taste buds dancing.
Small-Batch Perfection: Ideal for cozy evenings or intimate gatherings, it’s a dessert that doesn’t require a large commitment but guarantees big smiles.
Gluten-Free Option: Substitute the flour for a gluten-free alternative, ensuring everyone can indulge without worry!
Impressive Presentation: Its unique look makes it a stunning centerpiece for any table, showcasing your baking prowess effortlessly.
Get creative with toppings like whipped cream or fresh berries to elevate your dessert even further—just check out my recipe for Bake Cheesecake Wow for more scrumptious ideas!
Burnt Basque Cheesecake Ingredients
For the Cheesecake Batter
• Full-Fat Cream Cheese – A rich base to create a creamy custard texture, best used at room temperature.
• Granulated Sugar – Sweetens the cheesecake and caramelizes beautifully on top for that signature flavor.
• Large Eggs – Essential for structure and richness; bring to room temperature for the best blend.
• Heavy Cream – Adds to the creaminess and custard-like texture; you can swap for a lighter cream if preferred.
• All-Purpose Flour – Stabilizes your cheesecake; replace with gluten-free flour for a delightful gluten-free option.
• Salt – A small touch to enhance the sweetness overall.
For the Optional Toppings
• Whipped Cream – Provides a fluffy contrast to the rich cheesecake.
• Fresh Berries – Adds a burst of freshness and vibrant color to your dessert.
• Caramel Sauce – A decadent drizzle that takes your Burnt Basque Cheesecake to the next level!
Step‑by‑Step Instructions for Burnt Basque Cheesecake
Step 1: Preheat the Oven
Begin by preheating your oven to 400°F (200°C). This temperature is crucial for achieving that signature burnt caramelized top that defines a perfect Burnt Basque Cheesecake. While the oven heats, take out your 9×5 inch loaf pan and prepare it by lining it with parchment paper, allowing excess paper to hang over the sides for easy removal later.
Step 2: Blend the Cream Cheese and Sugar
In a large mixing bowl, combine the room temperature full-fat cream cheese and granulated sugar. Using an electric mixer, blend the mixture on medium speed until it’s completely smooth and creamy, which should take about 2-3 minutes. Look for a glossy appearance without any lumps; this ensures the cheesecake base will be luscious and rich.
Step 3: Incorporate the Eggs
Next, add the large eggs one at a time to the cream cheese mixture. Make sure to beat each egg in thoroughly before adding the next, ensuring a uniform texture. This process takes about 1-2 minutes per egg. The mixture should turn silky and well-combined, providing the structure and richness the Burnt Basque Cheesecake is known for.
Step 4: Fold in Remaining Ingredients
Gently fold in the heavy cream, all-purpose flour, and salt into your cheesecake batter. Use a spatula to mix by hand until just combined; it’s important not to overmix, as this can introduce unwanted air bubbles. The mixture should be thick yet smooth, showcasing the beautiful custard-like base that’s so well-loved in this recipe.
Step 5: Pour the Batter into the Loaf Pan
Carefully pour the cheesecake batter into your prepared loaf pan, using a spatula to ensure an even distribution. The batter should fill the pan about three-quarters full, allowing some room for it to rise. Make sure to tap the pan gently on the counter to release any air bubbles trapped in the batter, creating a smooth surface for baking.
Step 6: Bake to Perfection
Place your loaf pan in the preheated oven and bake for approximately 45 minutes. Keep an eye on the cheesecake; it should puff up and the top will develop a deep golden brown color with a slightly burnt appearance. The center should still have a slight jiggle, indicating the creamy custard texture inside is just right.
Step 7: Cool the Cheesecake
Once baked, remove the Burnt Basque Cheesecake from the oven and let it cool in the pan at room temperature for about 1 hour. This slow cooling process is vital as it helps maintain its creamy texture and prevents cracking. After it has cooled, carefully lift it out of the pan using the parchment paper and place it on a wire rack.
Step 8: Refrigerate for Best Results
Transfer the cooled cheesecake to the refrigerator and let it chill for at least 4 hours, or preferably overnight. This allows the flavors to meld beautifully and enhances the texture. When you’re ready to serve, take it out and allow it to sit for about 15-20 minutes at room temperature for the best flavor experience, and perhaps add some whipped cream or berries on top!
Storage Tips for Burnt Basque Cheesecake
Fridge: Store leftover cheesecake in an airtight container for up to 5 days. This keeps it fresh while allowing the flavors to deepen.
Room Temperature: For the best taste, let the Burnt Basque Cheesecake sit at room temperature for about 15-20 minutes before serving.
Freezer: Freezing is not recommended, as it can alter the creamy texture. Best enjoyed fresh to savor the unique caramelized top and custard-like quality.
Reheating: Serve chilled or at room temperature. If you prefer it warm, gently reheat it in the oven at a low temperature for a few minutes, ensuring a creamy consistency.
Burnt Basque Cheesecake Variations
Feel free to customize this delightful cheesecake, adding your unique twist to create an even more delicious experience.
-
Dairy-Free: Substitute cream cheese and heavy cream with coconut cream or a plant-based alternative for a creamy, dairy-free version.
-
Gluten-Free: Replace all-purpose flour with a gluten-free baking blend, ensuring everyone can enjoy this indulgent treat without worry.
-
Flavor Boost: Mix in a teaspoon of vanilla extract or lemon zest for a pop of flavor without overshadowing the cheesecake’s richness.
Give your cheesecake a refreshing twist by adding citrus zest; this brings a lovely brightness that complements the creamy texture beautifully.
-
Chocolate Lovers: Incorporate melted chocolate into the batter for a rich, chocolate-infused cheesecake that’s sure to satisfy any sweet tooth.
-
Fruit Swirl: Swirl in a fruit puree, like raspberry or blueberry, before baking for a stunning visual and a fruity flair that contrasts beautifully with the cheesiness.
-
Nutty Crustless Delight: Fold in crushed nuts or toffee bits into the cheesecake batter for a delightful crunch and extra texture, elevating every bite.
For even more scrumptious ideas, be sure to check out my article on Strawberry Cheesecake Protein for a delicious twist on traditional flavors, or explore the world of no-bake options with Bake Cheesecake Wow.
What to Serve with Burnt Basque Cheesecake?
Creating the perfect dining experience means pairing your delightful cheesecake with complementary dishes that enhance its rich flavors.
-
Fresh Berries:
The tartness of berries like strawberries or raspberries cuts through the cheesecake’s creaminess, adding a refreshing contrast. -
Whipped Cream:
A dollop of freshly whipped cream provides a light and airy element, balancing the cheesecake’s indulgent texture beautifully. -
Espresso or Coffee:
The bold flavors of a rich espresso bring out the creamy notes of the cheesecake while providing a delightful pick-me-up. -
Chocolate Shavings:
Dark chocolate shavings add a touch of sophistication while their slight bitterness perfectly complements the sweet creaminess of the cake. -
Caramel Sauce:
Drizzling a bit of warm caramel gives an added layer of sweetness and enhances that delightful burnt topping. -
Almond Biscotti:
Crisp biscotti offers a satisfying crunch that contrasts nicely with the smooth cheesecake, making each bite enjoyable. -
Spiced Pear Compote:
Warm spiced pears infused with cinnamon add a lovely fruity warmth that harmonizes with the cheesecake’s rich flavors. -
Herbal Tea:
Serving a steaming cup of chamomile or mint tea enhances the overall experience, leaving a fresh finish on the palate.
Consider these pairings and elevate your Burnt Basque Cheesecake experience tonight!
Make Ahead Options
These Burnt Basque Cheesecake treats are perfect for meal prep enthusiasts! You can mix the cheesecake batter up to 24 hours in advance; simply cover the mixing bowl with plastic wrap and store it in the refrigerator to maintain freshness and prevent drying. When you’re ready to bake, just pour the chilled batter into your prepared loaf pan and bake as directed. The cheesecake can also be baked ahead of time and stored in the fridge for up to 3 days. Let it cool completely before wrapping it tightly; this helps preserve its creamy texture and signature charm. For best results, take it out of the fridge to sit at room temperature for about 15-20 minutes before serving, allowing the flavors to shine beautifully!
Expert Tips for Burnt Basque Cheesecake
• Room Temperature Ingredients: Always start with cream cheese and eggs at room temperature to ensure a smooth batter without lumps, resulting in a creamy Burnt Basque Cheesecake.
• Don’t Overmix: When folding in the heavy cream and flour, mix just until combined. Overmixing can introduce air bubbles, affecting the creamy texture you desire.
• Cooling is Key: After baking, allow the cheesecake to cool slowly at room temperature before refrigerating. Rushing this step can lead to undesirable cracks.
• Golden Top Watch: Aim for a deeply golden brown top; this caramelization is what makes the cheesecake distinctive. It’s not truly burnt—instead, it’s beautifully charred!
• Chill Overnight: For the best flavor and texture, allow the cheesecake to chill overnight in the fridge before serving. This enhances the richness and makes each slice delightful.
Burnt Basque Cheesecake Recipe FAQs
What type of cream cheese should I use for the best results?
Absolutely, using full-fat cream cheese at room temperature is key! This ensures a smooth, creamy batter without lumps. The richer the cream cheese, the richer the cheesecake!
How should I store leftover Burnt Basque Cheesecake?
After indulging, store your leftover cheesecake in an airtight container in the refrigerator for up to 5 days. This method keeps it fresh and allows the flavors to deepen, making each slice even more delicious.
Can I freeze Burnt Basque Cheesecake?
While it may be tempting, I actually recommend against freezing this cheesecake. Freezing can change the creamy texture and ruin that beautiful caramelized top. Enjoy it fresh for the best experience!
What should I do if my cheesecake cracks?
If you notice cracks, don’t worry! This can happen if it’s cooled too quickly or if your mixer incorporated too much air. To prevent this, allow it to cool gradually at room temperature before refrigerating, and make sure to mix gently.
Can I make this cheesecake gluten-free?
Very much so! Simply replace the all-purpose flour with a gluten-free flour blend to make a delicious gluten-free Burnt Basque Cheesecake. It retains that wonderful flavor and texture without the gluten!
How do I serve the Burnt Basque Cheesecake for the best experience?
For an amazing flavor burst, serve the cheesecake chilled or let it sit at room temperature for about 15-20 minutes before enjoying. I love to add a dollop of whipped cream or a handful of fresh berries for extra flair!
Irresistible Burnt Basque Cheesecake Made Easy at Home
Ingredients
Equipment
Method
- Preheat your oven to 400°F (200°C) and line a 9x5 inch loaf pan with parchment paper.
- In a large mixing bowl, blend room temperature cream cheese and sugar until smooth and glossy.
- Add eggs one at a time, mixing well after each addition until silky.
- Gently fold in heavy cream, flour, and salt until just combined, avoiding overmixing.
- Pour the cheesecake batter into the prepared loaf pan, tapping gently to release air bubbles.
- Bake in the preheated oven for about 45 minutes until puffed and golden brown on top.
- Allow the cheesecake to cool in the pan for 1 hour then lift it out and place it on a wire rack.
- Refrigerate for at least 4 hours or preferably overnight before serving.
Leave a Reply